
Create a study circle
A study circle is your class. It holds your students, your schedule, your price, your homework and your grades. This is the one thing you have to set up before you can teach.
Before you start
What you need
- An approved teacher account.
- Payout setup finished, if you plan to charge in dollars.
- The dates your class starts and ends.
- About 20 minutes.
What you will have
- A class students can join.
- A session for every week you will teach.
- A join link and a code to share.
Start from New study circle in your teaching workspace. You will be taken through four screens: About, Pricing, Grading and Weekly plan. A progress bar at the top shows where you are.
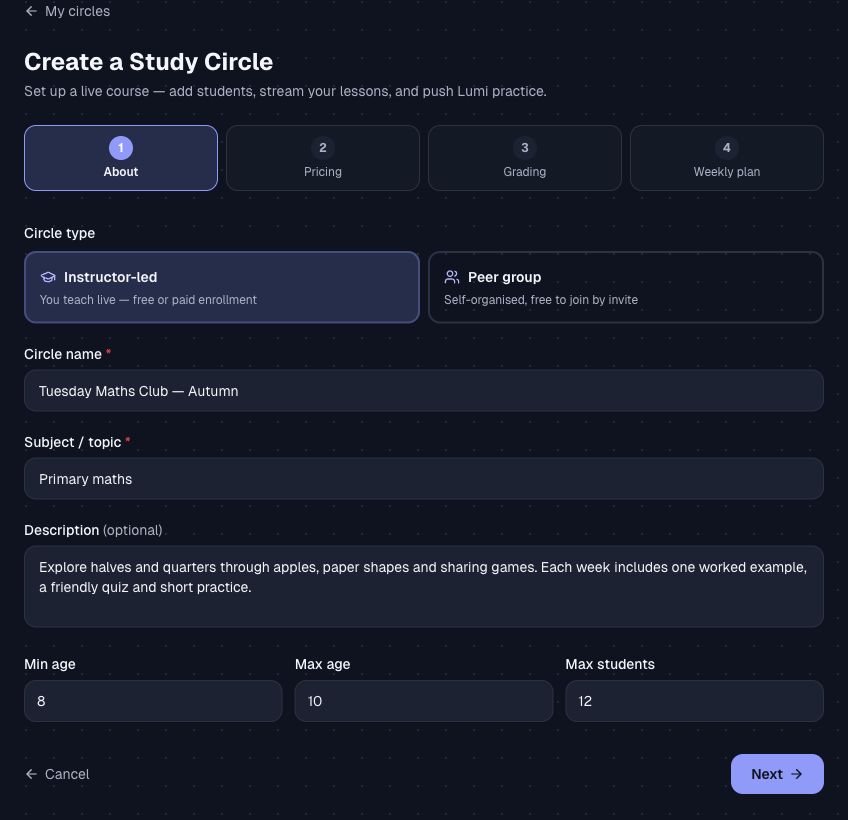
Step 1 · About — Who the class is for and what it is called.
About
First, choose the kind of class:
- Instructor-led — you teach it live. You can charge for it. This is what almost everyone wants.
- Peer group — a self-organised study group with no live teaching, free to join by invite. It skips the pricing and grading screens entirely.
| Field | What to put |
|---|---|
| Circle name | What students will see in their list. “Tuesday Maths Club — Autumn” beats “Maths”. |
| Subject / topic | The subject in a few words, for example “Primary maths”. |
| Description | Optional, but worth writing. What will students learn, how fast does it move, and do they need anything beforehand? |
| Min age and Max age | Optional audience ages from 5 to 99, including adult classes. Enter both ages or leave both blank. |
| Max students | The cap on class size. Once it is full, nobody else can join. |
Pricing
This screen only appears for instructor-led classes. It starts with Course dates: the day your class starts and the day it ends, typed as year-month-day, for example 2026-09-15.
These dates are not decoration. They define the window your class runs for, and they are used to work out what students get for their money, so put in the real ones.
Free or paid
Choose Free and you are done with this screen. Choose Paid and you also pick:
- Currency — dollars or rupees. Pick the one your students actually hold.
- Price per student — what each student pays to join for the whole course.
As you type a price you will see the split appear underneath: what the student pays, the 20% platform fee, and what you receive. See Get paid for the details.
Grading
You choose here how the final grade is worked out, and your students will see it. There are exactly two options, and the only difference is whether taking part in class earns marks.
| Counts towards the grade | No participation grade | Include participation |
|---|---|---|
| Attendance | 30% | 25% |
| Quiz and multiple-choice answers | 50% | 45% |
| Practice work handed in | 20% | 20% |
| Taking part in class | not counted | 10% |
You cannot invent your own percentages. This is deliberate: students and parents see the same two policies across every class, so a grade means the same thing everywhere.
There is a box to confirm you have read the policy. You have to tick it — and if you change your mind and switch policies, you will need to tick it again.
The full explanation of how each line is earned is in Grade and report.
Weekly plan
Last screen. Give each week a one-line title — “Week 1: equal parts”, “Week 2: halves and quarters”. Use Add week for as many weeks as your course runs.
This is the outline students see when deciding whether to join, so it is worth twenty minutes of thought. You can change it later.
Click Create circle and you land in your new class.
Your circle workspace
This page is where you will spend most of your teaching life. At the top there is the class name, a status you can change, and three counts: members, weeks and price. Below that are six tabs.
| Tab | What lives there |
|---|---|
| Overview | The join link and code, the class description, the weekly plan, the schedule, the price, and any courses attached to the class. |
| Sessions | One row per class meeting. This is where you go to prepare a lesson or start teaching it. |
| Members | Your students. Also where you email the whole class, and where the link to the gradebook lives. |
| Inquiries | Questions from people who are thinking about joining but have not yet. |
| Homework | Everything you have set, and its state. |
| Class | Announcements to the whole class, a discussion board, and a class calendar. |
The status selector
The status at the top controls what students can do.
- Draft — you are still setting up. Keep it here until you are ready.
- Open — students can find and join.
- Live — the course is running.
- Completed — the course has finished.
- Archived — tidied away out of your active list.
Add your sessions
A session is one meeting of your class. Go to the Sessions tab and add one for each week. For each session you set:
- Session title — what you are teaching that day.
- Week number — which week of the course it belongs to.
- Date and time — optional, but fill it in; it is what puts the class in your students’ calendars.
- Timezone — pick yours from the list. Students see the time converted to theirs.
Each session row links to its three stages — prepare, teach, review — which are covered in Prep a class.
Invite students
Open the Overview tab. Near the top there is an invite card with two things you can share.
- The join link. Copy it and send it to parents. It opens your class page, where they can read about it and join.
- The code. A short code for people who are typing rather than clicking — handy on a flyer or read out loud.
There is also a switch to turn the invite link off. Use it if you want to stop new people joining without closing the class.
What a student sees when they join
They land on your class page, read your description, the weekly plan and the grading policy, and then either join straight away (free classes) or pay first (paid classes). Paying students go through the card payment before they appear in your members list.
Giving someone a discount
Create a discount code on the Gift codes page and share it alongside the join link.
Opening enrolment
Before you share the link with anyone, check these five things.
- The description says what students will learn and what they need beforehand.
- The weekly plan is filled in, not left as “Week 1, Week 2, Week 3”.
- Sessions exist and have real dates and times.
- The price and currency are right — and if paid in dollars, payouts are verified.
- The status is set to Open.
Then send the link. Enquiries from people who have questions before joining land in the Inquiries tab, so check it while enrolment is open.