Go live
You can go live straight from your webcam in YouTube — no OBS needed. Bring in OBS only when you want to whiteboard from an iPad or show something else on your computer. Whichever route you choose, you will paste one YouTube link into your class.
Before you start
What you need
- A session with cards prepared.
- A computer with a webcam and a microphone.
- A Google account, for YouTube.
- About 15 minutes for a webcam-only stream, or about an hour for OBS the first time.
What you will have
- Your class watching you live inside their classroom page.
- Cards, polls and questions running alongside the video.
- A recording students can watch again afterwards.
Choose your streaming route
YouTube Live has two useful setup choices. Pick the one that matches what students need to see in this particular session.
| Webcam directly in YouTube | YouTube with OBS | |
|---|---|---|
| Use this when | Students only need to see and hear you teaching from your webcam. | Students need to see an iPad whiteboard, another application, a browser tab, or a layout combining your camera with those things. |
| What you need | Your computer webcam, microphone, and YouTube Live. No OBS. | OBS Studio, plus the camera, microphone, and anything you want to show. |
| What YouTube receives | Your webcam and microphone directly. | The scene you build in OBS: for example, your webcam in the corner and your iPad or screen behind it. |
| Recording afterwards | Automatic. The class can rewatch it. | Automatic. The class can rewatch it. |
YouTube · Webcam only (no OBS)
This is the quickest way to run a session. YouTube uses the webcam and microphone already connected to your computer, so there is no streaming software to install or connect.
Create a webcam stream in YouTube
Go to youtube.com, sign in, click the camera icon with a plus in it at the top right, and choose Go live. In YouTube Studio, choose Webcam — not Streaming software.
Choose your webcam and microphone, give the stream a title, and set visibility to Unlisted. That keeps it off public search while letting students with the class link watch. Check the preview, then click Go live.
Paste the webcam stream into your class
In YouTube Studio, copy the live video's share link. In Teachnow AI, open the session, choose the Live tab, paste that link into Stream and student video layout, and save. This is exactly the same last step for both the webcam and OBS routes.
YouTube · Use OBS for a whiteboard or screen
Use this route when your teaching needs more than a webcam picture. OBS is useful for bringing an iPad whiteboard and Apple Pencil into the stream, sharing another application or browser tab, or putting your camera in a corner while students watch the demonstration.
Install OBS
OBS Studio is a free program that takes your camera, your microphone and whatever is on your screen, puts them together into one picture, and sends it to YouTube. It is what almost everyone who streams anything uses. It is free, it has no adverts, and there is nothing to buy.
Download it from obsproject.com and install it the way you would install any other program. Choose the version for your computer — Windows, macOS or Linux.
The first time you open OBS it offers an auto-configuration wizard. Say yes. Choose Optimise for streaming when it asks, and let it run. It looks at your computer and your internet connection and picks sensible settings, which saves you making those decisions yourself.
Create the OBS stream in YouTube
Go to youtube.com, sign in, and click the camera icon with a plus in it at the top right, then Go live. This opens YouTube Studio.
Choose Streaming software — not Webcam, because OBS will send the iPad whiteboard, screen, browser tab, or combined layout to YouTube. Then fill in:
- Title — the name of your class and the week, for example “Tuesday Maths — Week 3: halves and quarters”.
- Visibility — choose Unlisted. This means only people with the link can watch, which is exactly what you want: your students have the link, the general public does not. Do not choose Private, because that stops your students watching too.
- Audience — YouTube asks whether the video is made for children. Answer honestly for your class.
On the next screen you will see a Stream key, hidden behind a Copy button. This is a long password that tells YouTube “this video is coming from me”. Copy it.
Connect OBS
Back in OBS, go to Settings (bottom right), then Stream in the list on the left.
- Set Service to YouTube — RTMPS.
- Paste your stream key into the Stream Key box.
Click Apply. You only ever do this once — OBS remembers the key for every future class.
The two other settings worth checking
If you ran the auto-configuration wizard, these are already sensible and you can skip ahead. If you want to check them, or your video looks poor, here is what they mean and what to use.
| Setting | Where | What it means | Use |
|---|---|---|---|
| Output resolution | Settings → Video | How big the picture is. Bigger is sharper but needs more internet. | 1280×720 for teaching. 1920×1080 only if your internet is fast and you are showing fine detail. |
| Frames per second | Settings → Video | How smooth movement looks. | 30. You are teaching, not streaming a video game. |
| Bitrate | Settings → Output | How much data your video uses each second. Higher looks better but needs a faster upload speed. | 2500–4000 for 720p. If your video keeps stuttering, lower it. |
| Encoder | Settings → Output | Which part of your computer does the work of compressing video. | Whatever OBS picked. If you see an option with your graphics card’s name — NVENC, AMD, Apple — that one takes the load off your processor. |
Build your OBS scene
A scene is a layout. Most teachers need one: your screen, with your face in the corner.
In the Sources box, click + and add these, in this order:
- Display Capture (or Window Capture if you only want to share one program). This is what is on your screen. Add it first so it sits at the back.
- Video Capture Device. This is your webcam. Drag it to a corner and drag its handles to make it small.
- Audio Input Capture. This is your microphone. Speak, and check the volume bar at the bottom moves into the yellow but not the red.
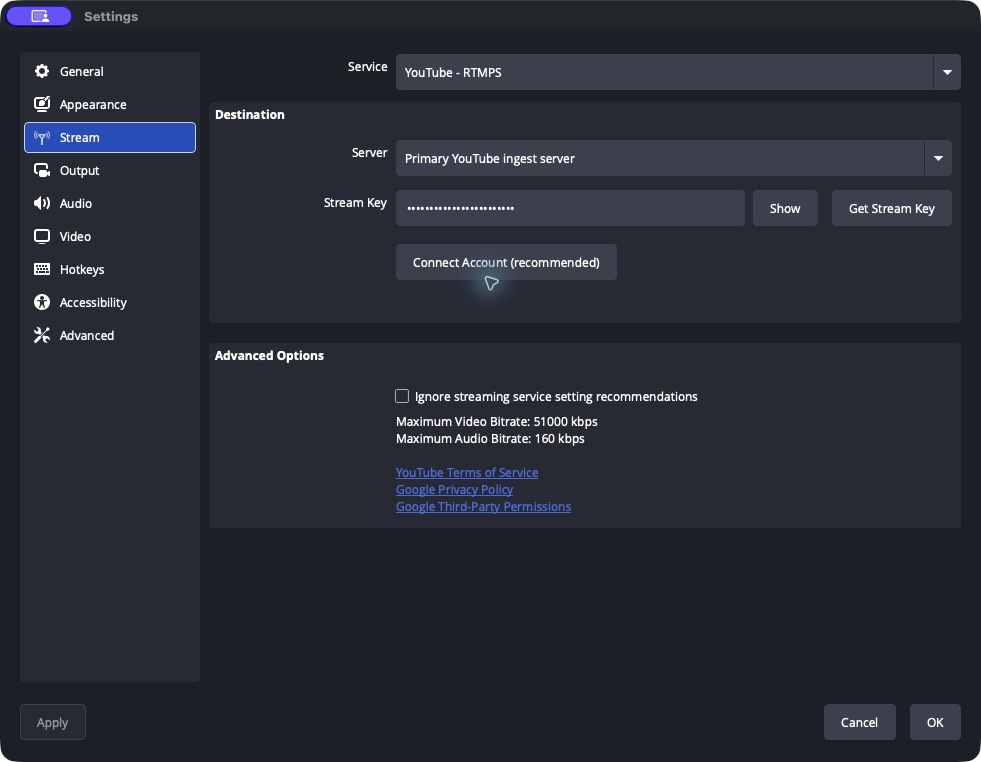
OBS · Stream — Choose YouTube and paste your stream key. Keep it masked, as shown here.
Start streaming from OBS
About ten minutes before class, open OBS and click Start Streaming at the bottom right.
Switch to YouTube Studio. Within a few seconds the preview should show your picture and the connection quality should read as good. You are now broadcasting — but nobody is watching yet, because nobody has the link.
This is your moment to check three things: can you see yourself, does the volume bar move when you speak, and is anything on screen that should not be.
Paste the OBS stream link into your class
In YouTube Studio, find the share icon and copy the video link. It looks like https://youtu.be/aBcD1234 or https://www.youtube.com/watch?v=aBcD1234. Either form works.
Now go to your class in Teachnow AI, open the session, and click the Live tab. In the panel headed Stream and student video layout there is one box. Paste the link there and save.
That is it. Your students’ classroom page now plays your video inside the page, right next to your cards and polls.
Using Zoom instead
If you would rather use Zoom or Google Meet, the process is much shorter.
- Schedule the meeting in Zoom or Meet as you normally would.
- Copy the join link.
- Paste it into the same box on the Live tab and save.
- Start your meeting at class time.
Your students see a button labelled Open live stream, which opens the meeting in a new tab.
Running the room
With the video sorted, the Live tab is your teaching desk. Here is what is on it and when to reach for each part.
Pushing cards
Your prepared stack is down the left. When you get to a card in your lesson, click Push. It appears on every student’s screen straight away, and stays there until you push the next one.
Video layout
Two buttons control how students see your video, and you control it for the whole class, not each student individually.
- Floating — a small draggable video window, so the card is the main thing. Use this most of the time.
- Full video — the video takes over. Use it while you are demonstrating something on your screen and there is no card to look at.
Polls
Push a poll you prepared, or write one on the spot in the poll box. Answers arrive as a live tally you can put on screen. A poll every fifteen minutes is a good way to catch a class that has quietly stopped following.
Questions
Students type questions into a panel on their side, and they queue up on yours with a count of how many are waiting. You can answer out loud, or have Lumi draft an answer for a question that is off to one side of what you are teaching.
Class pulse
A quick check on how the class is doing — whether they are following, lost, or ready to move on. Useful in a class where nobody wants to be the first to admit they are stuck.
Practice answers
When you push a practice card, answers appear as students submit them. You can see who has finished and who has not started, which tells you when to move on.
Attendance
Anyone who opens the session page is counted as present. You can correct the record afterwards from the gradebook if someone had trouble connecting.
Ending the class
Three things, in this order:
- In Teachnow AI, click End session. The After class panel appears with two links: one to put your remaining cards into Materials, one to set homework.
- In OBS, click Stop Streaming — only if you used the OBS route.
- In YouTube Studio, end the broadcast.
The link you pasted stays with the session, so the YouTube recording becomes the class archive — the first thing students see in Materials, ready to rewatch.
Then move on to setting homework and marking the practice work from the session.
Troubleshooting
Students say they cannot see the video
Check three things in order: that your chosen route is still live (OBS says it is streaming, or the YouTube webcam preview is live), that YouTube Studio shows the broadcast as live, and that the link you pasted is the one for this broadcast and not last week’s. Pasting an old link is the single most common cause.
The video is stuttering
Your internet is not keeping up. Lower the bitrate in Settings → Output — try 2000 — and drop the resolution to 1280×720. Also close anything else using the connection, and use a cable instead of wi-fi if you can.
My screen is black in OBS
On a Mac, allow OBS under screen recording permissions and restart it. On Windows with two graphics cards, use Window Capture instead of Display Capture.
Nobody can hear me
Look at the audio bars at the bottom of OBS while you talk. If they do not move, your microphone source is missing or muted — check the speaker icon next to it, and check the right microphone is selected in its properties.
My students are a few seconds behind me
Normal for this kind of streaming. It is why questions come in through the questions panel rather than by voice. If you want it shorter, YouTube has a low-latency option in the stream settings — but do not chase it below a few seconds; stability matters more.
I forgot to paste the link and class has started
Paste it now. Students see the video appear as soon as you save — there is nothing to restart.